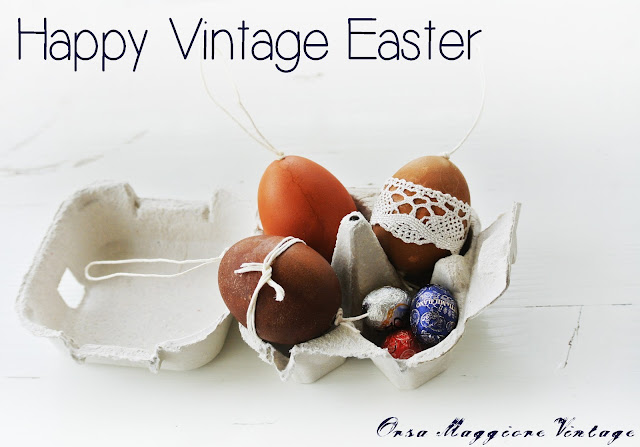
I am not really doing DIY posts on Orsa Maggiore Vintage, but - if you know me it won't be a surprise for you - besides my vintage obsession I am pretty crafty as well
This year magically I've managed to decorate some Easter eggs in time and they are soooo pretty that I decided to write a short tutorial for you out there - maybe you are hunting for vintage Easter decor inspiration these days
If you would like to create similar shabby chic Easter eggs, after the jump you can find the detailed process of "naturally dyed eggs decorated with lace and kitchen twine"
We used to decorate Easter eggs every year since I was little girl, because in Hungary on Easter Monday the boys traditionally go house-to-house to "sprinkle" the girls (with perfume, or cold water if they are mean) and they expect to get decorated eggs in exchange...
You can find more on this tradition called "locsolkodas" if you are curious here
But back to the eggs...What you need
- eggs (better if you find bigger "farm" eggs with stronger shell)
- onion skins, as much as possible (for other natural dyes here you can find some ideas)
- vinegar, olive oil (a few spoons from both)
- lace ribbon (you can find it easily in textile shops, if I didn't have it I would cut up doilies)
- kitchen twine (or any other simple natural string)
- glue (better if it dries very fast)
- long needle, toothpick or skewer (helps a lot to file the twine in the egg, the best is a not too thick wooden barbecue skewer)
1. Blow the eggs
- poke a small hole on both sides of the egg with a small knife
- blow all the liquid out
you may want to fill the egg with some water, shake it and blow it again to make it cleaner (since in this case we will boil them in water I don't find it really necessary)
2. Dye with onion skin
- put the eggs in a saucepan filled with water, a lot of onion skin and a spoon of vinegar
make sure that all the eggs are perfectly sunk
- bring it to boil and leave it to dye for at least 3-4 hours (I recommend a whole night)
if you wrap the eggs in the onion skin you will have some nice pattern on them, while if they are staying in the water the color will be more homogeneous
- take them out carefully, blow them again, let them gently dry with a clean cloth
- rub some olive oil all over the painted surface to make it shine
3. Time to decorate!
- cut up the twine in order to make hangers for the eggs (approx. 30 cm/10 inch pieces)
- fold the twine in two and with the help of the skewer file it into the eggs through the holes from the bottom up, in order to get a loop on the top side
- tie a knot on the bottom and on the top as well to cover the holes, you may want to fix the knots on the egg with some glue
- and now use your fantasy - glue the lace ribbon and the twine on the eggs
- when you are done, let them hang until they dry perfectly
And voilà, your really own unique shabby chic, natural Easter decor is done! Time to collect the compliments :)
Contact me if you have any questions, and I really appreciate feedbacks, please let me know what you think!
Visit my shop
Follow us
Instagram orsa_maggiore_vintage


No comments:
Post a Comment